
There’s such a plethora of software reverbs, that an editor who wants to be a cut above the rest has to rely on originality. By allowing you to create any reverberating space you’d like, and to precisely define a vast amount of its sonic characteristics, for a reasonable price, QuikQuak RaySpace is a reverb that has a lot going for it.
Installation
 |
You can download the plug-in from the editor’s site, the demo version can be later upgraded to the full version, with the appropriate KeyFile and some information to be entered when prompted. The current version is v.2.91, available for (AU and VST) and Windows (VST only). The plug-in includes a “stereo only” version, in case the host doesn’t support multi-outs.
QuikQuak has named its algorithm Diffuse Bubble Tracing. It’s an adaptation, into the sound domain, of the ray-tracing principles used in image synthesis and in optics, according to Fermat’s principle: “The path taken between two points by a ray of light is the path that can be traversed in the least time ”. The full version of Fermat’s principle, depending on the source, states that the optical path length must be stationary, which means that it can be either minimal, maximal or a point of inflection. Be that as it may, we’ll leave the technical stuff and its complex ramifications to the specialists, since we’re mainly interested in the sound results and how to go about setting the various parameters in the plugin’s interface.
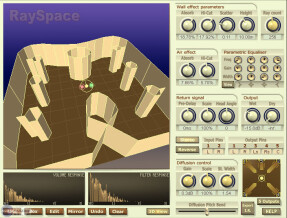
A main goal of Dave Hoskins (the editor), is to offer plugins with “a more visual approach to sound, hopefully giving the user a better understanding in the process”, which is logical given his experience in computer graphics and game ergonomics. Therefore it comes as no surprise that RaySpace offers a big GUI. On the left, there’s the 3D screen, which can be toggled between Edit mode, EQ mode and to even display the manual (the latter being included in the plug-in, a clever idea).
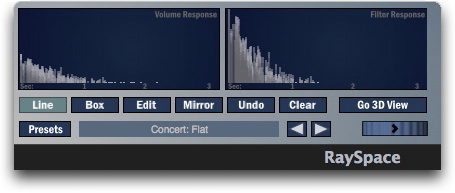 |
At the bottom of the GUI there are two screens that display the volume and filter responses of the room/space. Several buttons allow you to choose the drawing mode (Line or Box), the edition of walls and boxes (Edit), the automatic drawing of symmetrical rooms (Mirror, horizontal symmetry), the Undo (unlimited) and a complete reset (Clear). You’ll also find preset selection and save tools.
Last but not least, the displaying tool, a wheel (Ray Jog Dial) which allows you to see the rays coming out of the sources, for their first 3000 meters. It’s useful to understand how the reverberated sound is produced, and how to modify the space if needed. One nice detail: when you release the wheel, the rays slowly go backward to their sources… And, surprisingly enough, CPU consumption remains quite low.
In the beginning…
 |
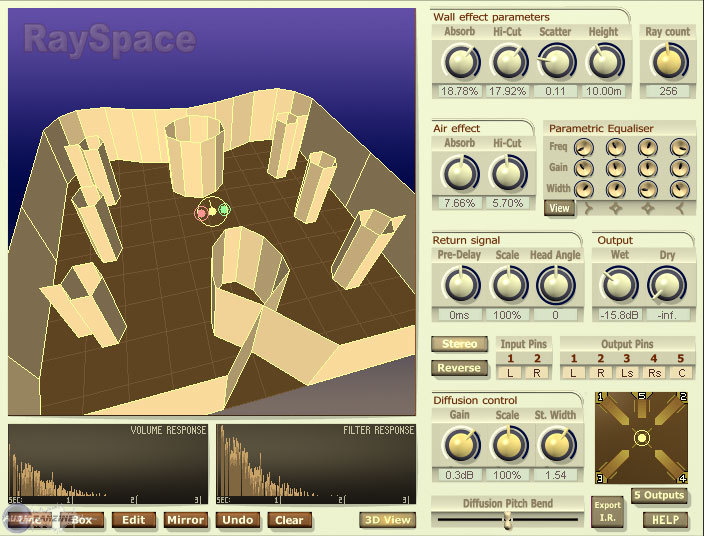
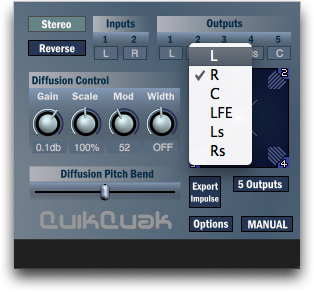
First, you have to choose whether to work in mono, stereo, quad or 5.1, by clicking on the 2-Ouput button and/or the Stereo button in the dedicated section. The Surround Panner shows the changes made in real time. Then you can move the yellow circle to modify the amount of sound sent to each output. You can also assign different inputs/ouputs in their relevant sections. Note a Reverse function (thanks, QuikQuak).
Then you create your space/room, starting from a preset or from scratch, in Edit mode, by drawing lines, boxes, etc. You can experiment with all kinds of spaces, creating unreal or realistic environments; each square is 50×50m. If you’re not too demanding with details and precise architecture (no curves, no various heights, etc.), you can program spaces in order to make some movie-ambience editing in post-production, even if convolution reverbs are usually very efficient tools for this purpose. Nevertheless, the ability to recreate any room, with all its angles, walls, doors, etc. can be a big plus when dealing with post-prod retakes, when you have to recreate an environment similar to a movie stage or set. Left-click to draw a line or a box, right-click to erase, Undo, Clear if you want to start from the beginning, and Recall of the modified preset: everything is done with lightning fast speed.
Once the space is built, you’ll have to set diffusion, physical reactions, air and surface absorptions, etc. Then you set the source, either mono or stereo, appearing as two animated circles (L and R) and the Listener, a yellow circle with a little arrow indicating his listening direction. These circles can appear anywhere on the grid, and can even move via automation of X/Y parameters, which is a function rarely (almost never) available. Note that almost all parameters can be automated, except, of course, the number of rays.
Settings galore
 |
The designed space/room can be relatively complex, so it’s a pity that the zoom available in 3D mode isn’t in Edit mode, which could allow you to build more detailed shapes.
You start by setting the wall absorption ratio, from 0 to 70%, according to an exponential curve. This is important, because the setting will sometimes be done within a few value changes, usually in the first half of the knob range. Ratio and range are the same for Hi Cut, which specifically defines high frequency absorption, allowing it to go from a harsh hiss to an almost completely muffled sound. The Scatter parameter increases the number of random reflections, sometimes drastically changing the sound. Height sets the global height of the walls, from 2 to 22m. It’s a pity that you can’t independently adjust the height for each of the different elements; possibly a choice dictated by the amount of calculation that would be needed…
Ray Count sets the number of rays sent from the sources, from 6 to 512. Naturally, CPU consumption is linked… Note that Ray Count as well as Scatter offer a quick visualization of their effect when you click on the knobs. Other settings are related to air absorption: Absorb lowers the volume, and Hi Cut the high frequencies, according to a ratio applied for every 100m traveled.
 |
Then the Return Signal section handles decisive parameters: Pre-delay (± 500ms) allows you to create that well-known delay essential to some reverb sounds, but also to compensate for the gap created by long distances. However, the pre-delay setting here isn’t completely the same as the one we‘re used to, because the ray generation and the space modeling behavior naturally take it into account. For example, using Pre-delay with negative values allows you to cut the first reflections (and some of the following ones…). This sound design ability is quite rare, therefore it is most welcome. Scale (from 0 to 200%) modifies the global size of a room, without changing the character of the reverb. Head Angle changes the listening direction. Then there’s the Output Gain section, with Wet (-8 to + 4 dB) and Dry (-8 to 0 dB) knobs.
Final settings and sound examples
 |
The next to last section: Diffusion. Gain increases or reduces the diffusion ratio, Scale changes its extent/length according to the designed space (from 0 to 800%, 100% being the default value), Mod adds modulation and Width changes the stereo image, from mono to phase opposition. You should be careful when using these settings, unless you want to create special effects. This section also offers another rare setting, Diffusion Pitch Bend, which acts as a pitch bend on the diffuse sound (continuous or automated). Guaranteed for spectacular and totally new effects.
The last section which seems to be optional, but turns out to be an essential tool, is the EQ. Two shelves, low and high, and two parametrics offering Frequency, from 20 Hz to 16 kHz, Gain, which seems to be around 40 dB (when the displayed scale only goes to 25 dB) and Q. Why is it essential? Because Absorption and Hi Cut parameters can’t do everything, in particular when the reverb needs to sound boomy, or when you need to enhance or cut some frequencies, etc. And EQ can be very useful for recreating specific reverbs. Finally, note the nice Export IR function, allowing you to use the created spaces in convolution reverbs. I’ve imported the IRs into Altiverb XL and Space Designer and they’ve worked perfectly (after the various conversions, Wave to sd2, etc.).
Let’s hear some audio examples. For the first example, the idea was to approximately reproduce the cathedral of Chartres, keeping in mind that you can neither set different heights nor different materials (in this case, you’d need emulations of stone, wood, stained glass, etc.). The Listener is the organist rather than someone listening from the nave or the apse. The EQ was very helpful in cutting out a large part of the high frequencies.
 |
Another example, a drum pattern, first raw, then with an emphasis on the kick, finally going thru the Round Chamber and Stage Complex presets. Do you need an unreal bass drum? All you have to do is ask. Deep filtering, Width set to zero, increase the low content and you set the desired length by fine tuning the two Scale parameters.
Then a speaker announcement, in a train station PA system. You’ll only have to add passenger noises, some music in the background and train sounds…
This example uses Logic’s automation, simulating a listener walking in a concert hall, moving away from the stage.
The final examples show RaySpace’s FX potential, with preset Wacky Harmony, preset Poisoned! and a continuous ascending pitch effect (the audiofile has been cut before the end…).
Conclusion
An original concept, numerous possibilities, complete automation allowing you to move your Listener or sources within a space/room, very efficient ergonomics, low CPU consumption and an interesting sound: RaySpace offers way more than its price might suggest. But you have to be aware that, despite the 90-plus factory presets (classified by type, very good programming), the plug-in needs a certain learning curve when you want to start from scratch. It is not as simple as choosing an algorithm, and setting the pre-delay, reverb time and EQ… You have to tweak and refine each parameter, sometimes randomly, and the whole process is very different from the usual way of working with reverbs. For example, the EQ isn’t there only for small adjustments; it is essential for creating the final sound. And the interaction between the various parameters also implies a certain amount of practice. Luckily, the ergonomics are really well designed, and the various displays will be of great help.
Admittedly, RaySpace has neither the roundness of some convolution reverbs, nor the precision of hi-end soft reverbs. However, its price is on an altogether different scale from competitors with an equal sonic quality, all the more so as the latter don’t offer RaySpace’s creative and setting abilities. And if the plug-in is convincing for simulating real spaces, notably thanks to its automation capability which is very useful in post-production (check the demo video here), it also has an interesting sound design potential. It’s exactly this experimental side that I’m inclined to use.
In a nutshell, RaySpace is a nice surprise, and anybody can verify this by simply downloading the demo version from Quikquak’s site.
[+] Concept
[+] Customized space creation
[+] Visual approach
[+] 3D visualization
[+] Automation
[+] Ability to move objects around within the spaces (Listener and/or sources)
[+] Lots of parameters
[+] Creative potential
[+] Surround
[+] Fast Impulse export
[+] Undo and Recall
[+] Low CPU consumption
[+] Price
[-] Needs a learning curve
[-] Loss of bearings – very different from most reverbs
[-] Can’t handle all scenarios
[-] High frequencies sometimes a bit harsh
[-] No zoom in Edit mode
[-] Only one automatic box shape (parallelepiped)
[-] Only one global height
[-] Only one definition of wall material