


If you use audio drum tracks in your productions, whether loops or multitrack recordings — you’re likely to have plenty of occasions where you wish you could adjust the levels of a particular drum or cymbal that’s mixed in with other kit elements. Drum Leveler by SoundRadix is a specially designed compressor/expander plug-in that lets you aim at those individual drums and cymbals so you can raise, lower or isolate them in the mix. It gives you a whole new level of control over your drum tracks.
Drum Leveler works on both Mac and PC, and supports AU, AAX, RTAS, and VST formats. The plug-in is available in both 64– or 32-bit versions. Installation and authorization are pretty straightforward, and consist mainly of entering a license code after you’ve set up an account on the SoundRadix site (if you don’t already have one).
Into the GUI
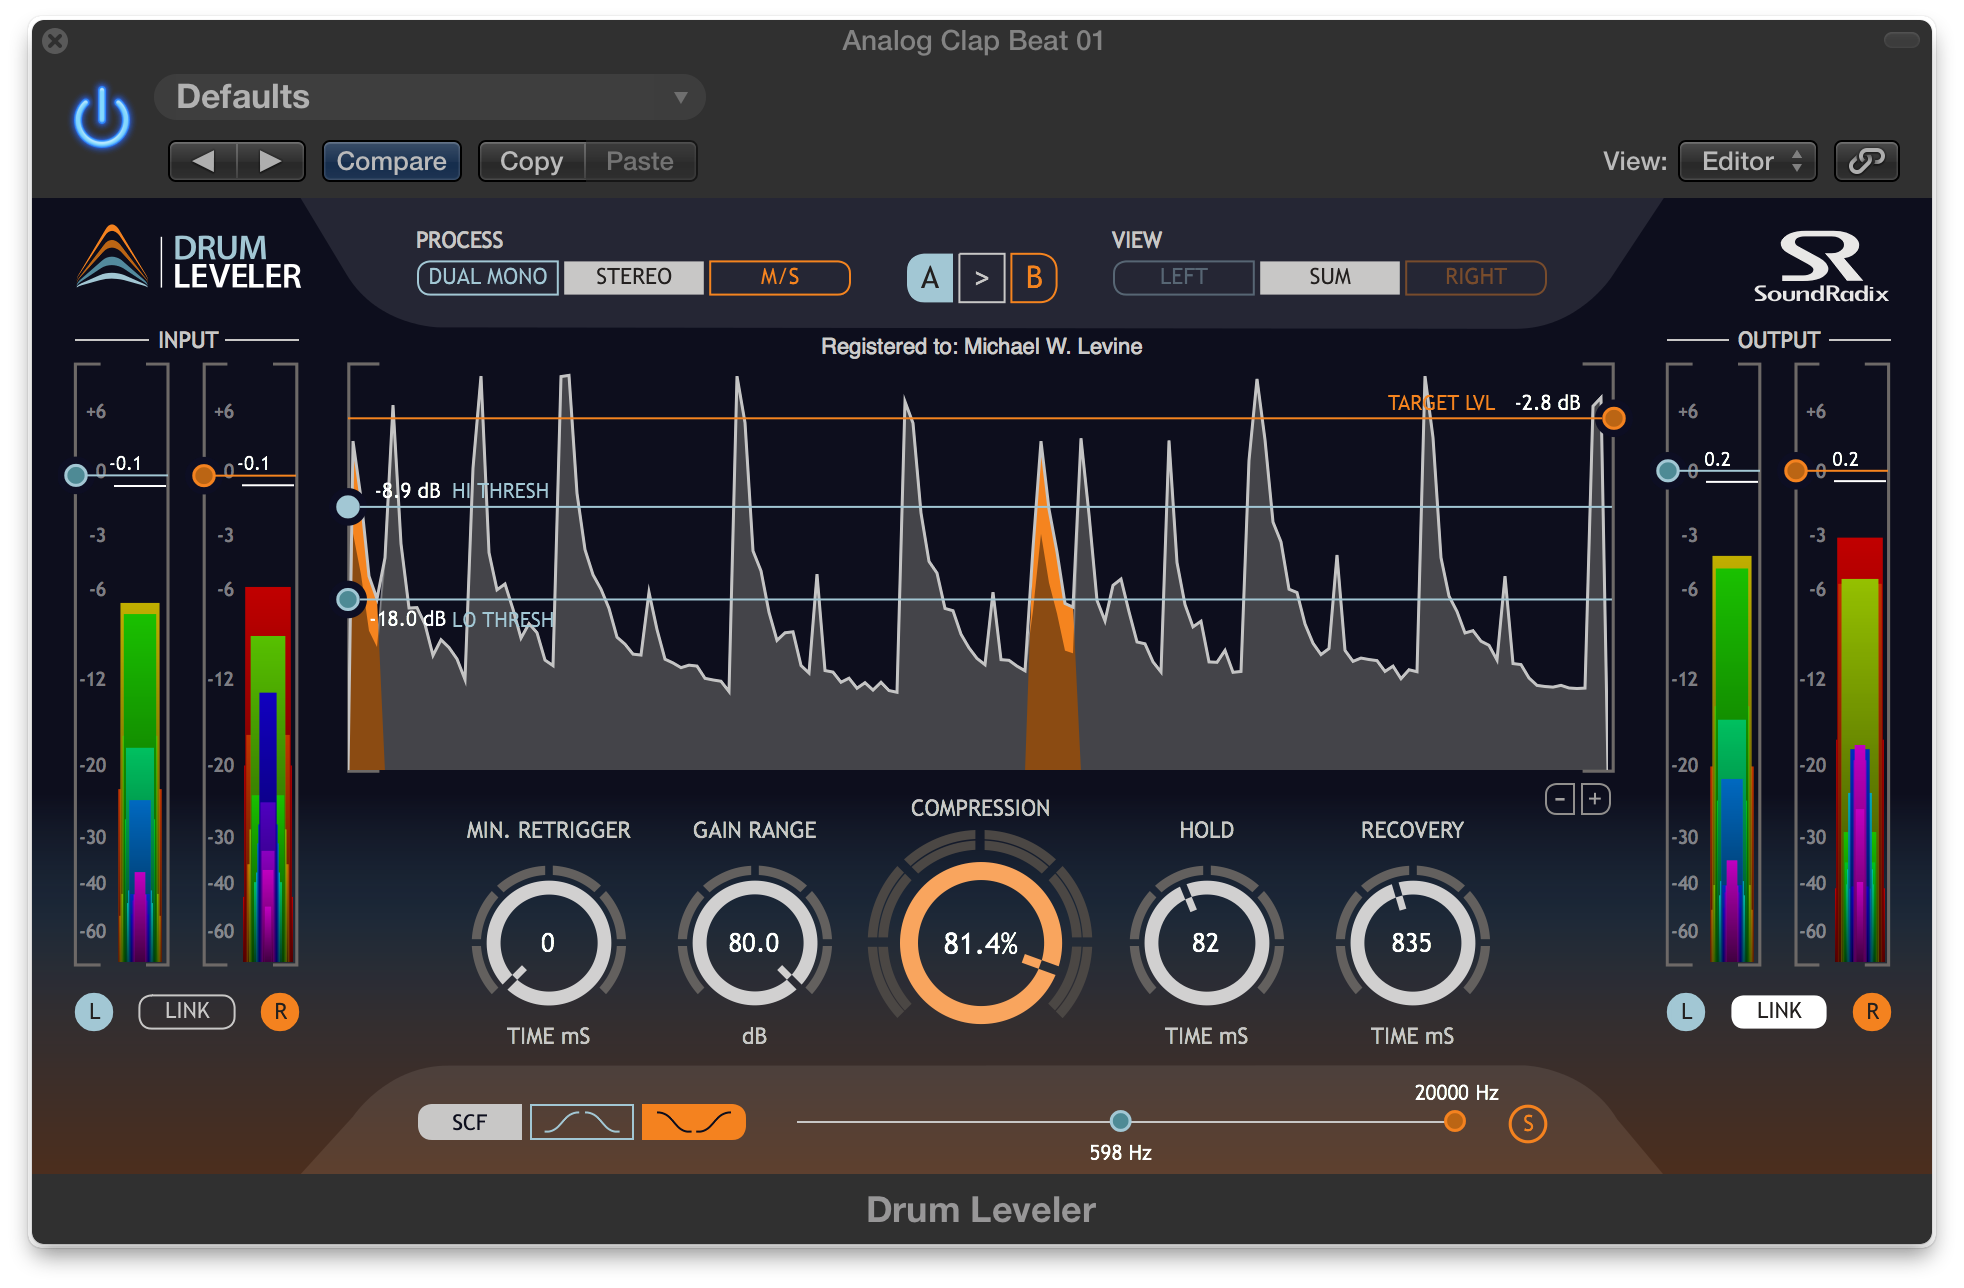 |
Drum Leveler’s main screen features a large display that shows animated representation of the various drum hits in real time, in a wave-like representation that represents amplitude (but not frequency) over time. One of the keys to Drum Leveler’s design is that it detects each individual hit as a separate and potentially editable event, and each event shows up as a peak on the display. As your audio plays, the events come scrolling by from right to left, and are color coded, depending on whether they’re being boosted, cut or are unaffected. Unfortunately, the manual gives no explanation of how to read this display, which is surprising, considering how important it is for setting Drum Leveler. I’ll get back to that later in the review.
Perhaps the most unique part of Drum Leveler’s interface is that unlike a conventional compressor, it has two thresholds: one high and one low. Two horizontal blue lines sit at the top of the display when the plug-in is at its default setting. One controls the high threshold, and the other the low threshold. They can be dragged vertically over the display area. Any audio event whose amplitude peak reaches above the high threshold line is left unprocessed, and any one whose peak is below the low threshold is not touched either. Only events whose peaks are between the two thresholds get processed.
A third horizontal line, this one orange, is called Target Level. It can be set from 0 dB to –80 dB, and its behavior is a little more complicated. When the plug-in is set for compression, any drum event (transient) whose peak is within the processing thresholds and below the Target Level line, will be raised, if it’s above it will be lowered. The amount of raising and lowering is based on a combination of the Target Level setting and the Compression (amount) knob. If you turn the Compression knob to the left of 12 o’clock, it puts Drum Leveler into Expansion mode, where everything works in the opposite manner. Events within the processing area but above the Target Level line will be raised, and those below decreased.
If you think it sounds confusing, frankly it is. It took me a while to gain a reasonable understanding of how to set Drum Leveler for different situations. The manual offers very little tutorial information, and it leaves out some key feature descriptions. There is one useful tutorial video on the Sound Radix site, more would be helpful.
More settings options
Continuing with the interface description, below the main display sit five circular knobs. The center knob, which is also the largest one, is the aforementioned Compression/Expansion control. It changes the amount of compression or expansion that you’re adding to the signal, as expressed by a percentage. On the left side is the Minimum Retrigger knob, which sets how quickly or slowly Drum Leveler detects events. Depending on the other parameter settings and the levels of the drums vis-a-vis each other in the source audio, it can cause Drum Leveler to treat multiple hits as if they were the same one.
 |
The Gain Range control is more straightforward. Ranging from 0 to 80 dB, it lets you control how much processing is applied to a detected beat. The Hold time let’s you adjust the length of the transient of a processed beat. The lower the setting (in ms) the shorter the attack. The Recovery time is like a release time control on a typical compressor. It governs how long the compressor continues to process an event. Shorter settings chop off the sustain of beats, and longer settings let the beats ring out more.
Taking sides
Another way to control what Drum Leveler processes is by using its Sidechain Filter controls. These include a button to turn the filter on, and one to select between the Band Pass and Band Stop filter modes. The former lets you set a frequency range within which Drum Leveler will focus (and works in conjunction with the threshold controls — this isn’t made clear by the manual), and the latter lets you set a frequency range within which it will ignore. When you’re trying to zero in on a particular drum within a track, the filters can be helpful. The S [solo] button makes it easier, as it lets you listen only to the audio that’s going through the filter.
Other noteworthy controls on Drum Leveler include input and output sliders for which the left and right are linked, but can be de-coupled to adjust each side separately. The meters that accompany the level show different frequency ranges as different colors, which can help you grasp the levels of individual drum elements, although I didn’t find it all that useful.
Drum Leveler can run in several different modes: Mono, Stereo, Dual Mono and MS. The only time it will run in mono is when you apply it as a mono instance to a mono track. The other three modes can be switched between from the interface when you’re working with a stereo track. Stereo processes both sides equally, Dual Mono lets you set different settings for the left and the right channels, and MS mode lets you do the same with the middle and the sides. Sometimes if you have an element like a cymbal that’s panned pretty far to one side or another, you can address it from the Sides setting in MS mode.
Grokking the display
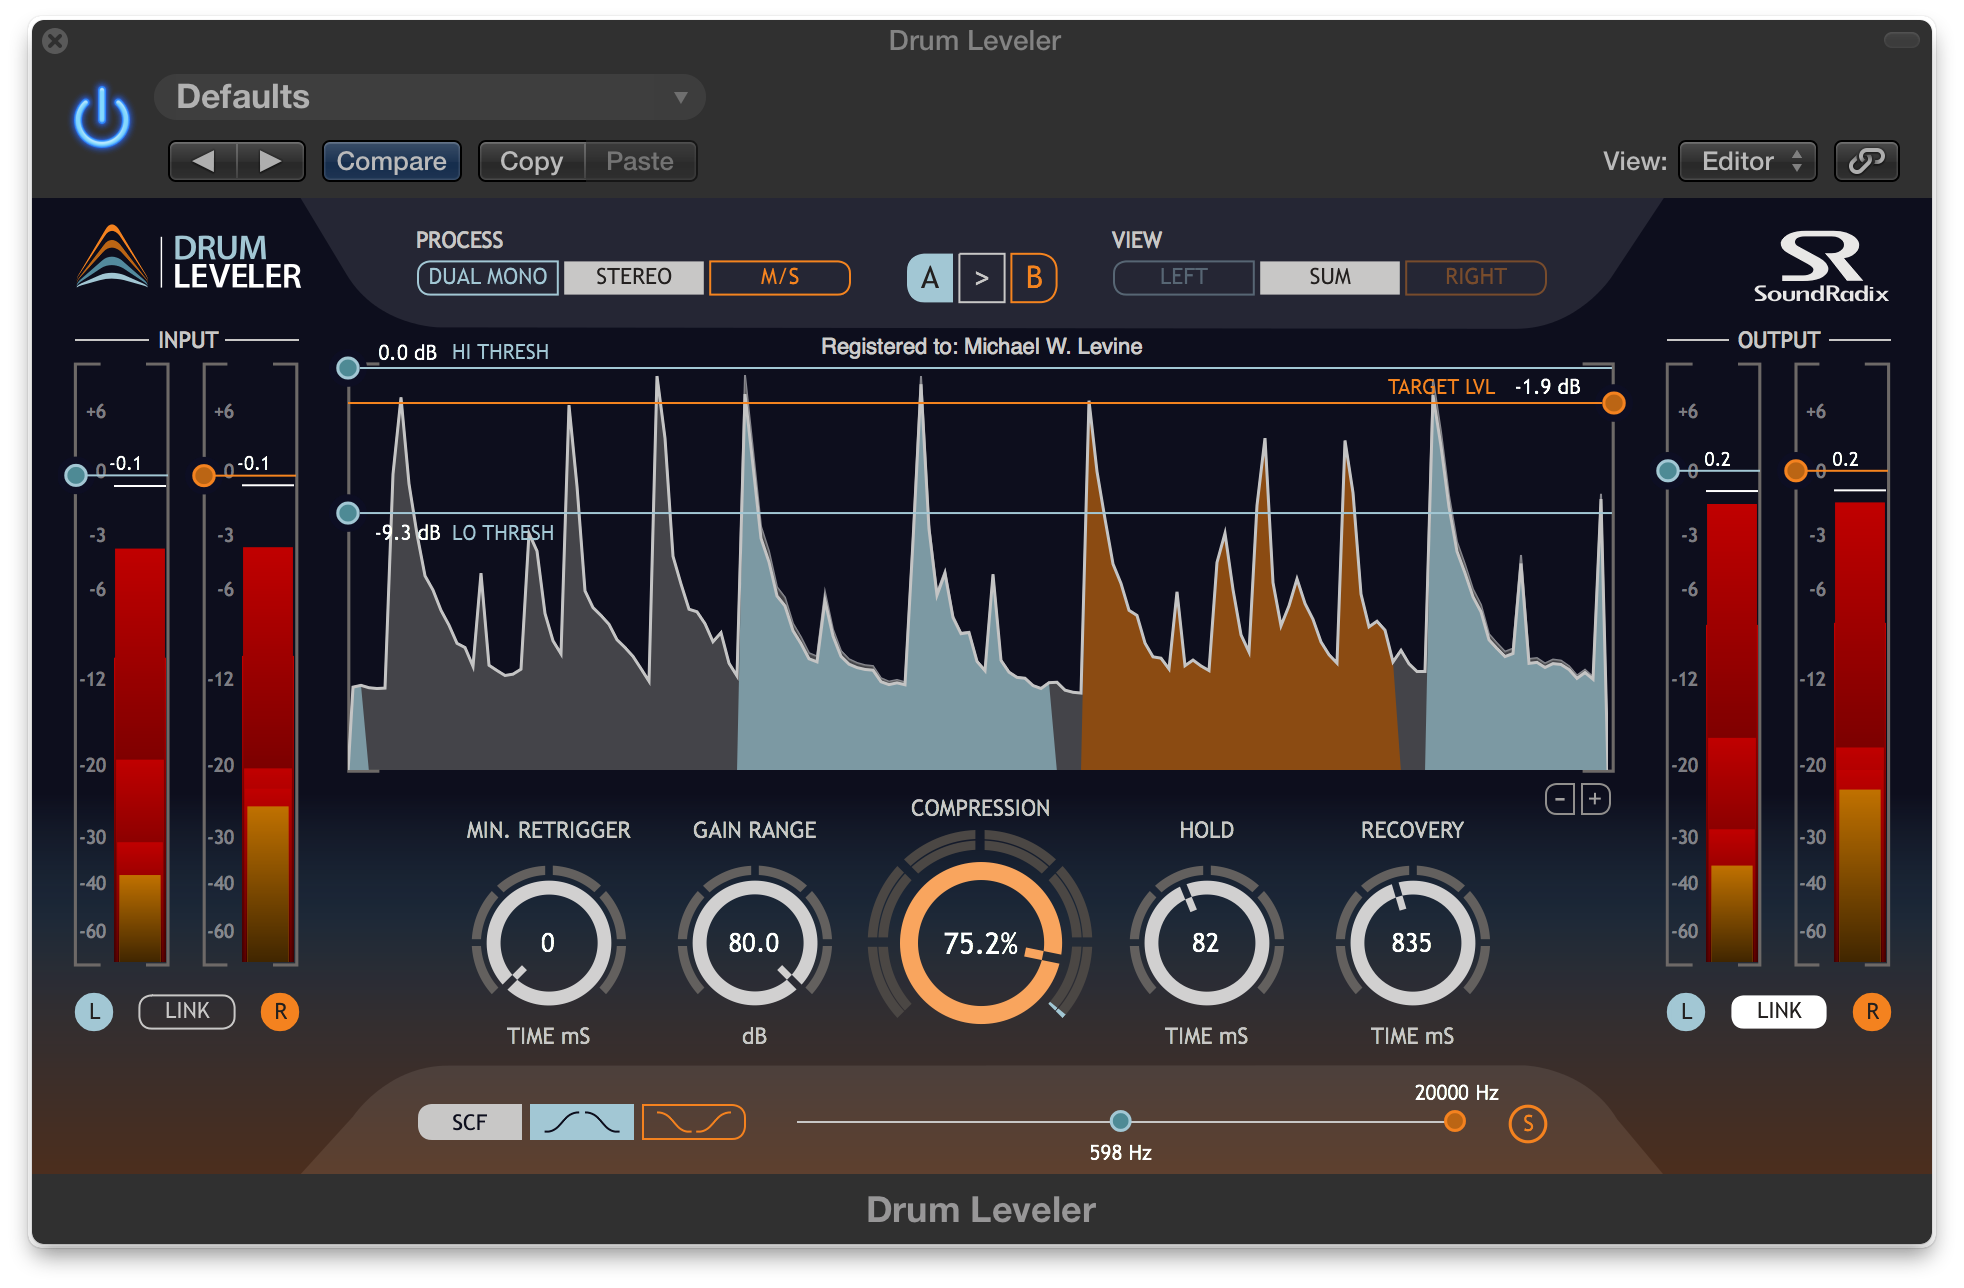 |
As mentioned, the manual doesn’t tell you how to read the display, and it’s not completely intuitive. After lots of messing around with the plug-in, I figured it out. At the moment that you hear a given beat, it’s the farthest rightward beat visible as they move right to left. Unaffected beats show up as gray. Beats that are being boosted turn orange, and beats that are being reduced turn light blue (see video at the end of this review).
The display also reflects the settings of the Hold and Release parameters. You see that short hold times only process the early part of the attack. So in that case, the beginning of the beat is in orange and its decay in gray. If you lengthen the hold time, the processor works on more of the beat and the orange section extends out correspondingly. Once you understand it, the display is extremely informative and helpful.
On the level
I used Drum Leveler for a wide range of tasks, and often was able to achieve what I was trying to do, whether it was lowering, raising or removing a particular drum, or isolating one element. I was much more successful when processing loops where there were significant differences between the drum levels to start with. When the levels were all very close together, setting the thresholds to zero in on a particular drum was harder, although the Sidechain Filter could be effective in those circumstances.
Drum Leveler is a challenging plug-in to master, and this is due to both its complexity and to a manual that leaves out some vital information. Despite this, I’ve given it a 4-star rating because it’s a breakthrough product that offers control over mixed drum tracks that was previously impossible.
[For a further explanation of the GUI, and to see Drum Leveler in action, watch this video.]