

The new Pro Tools has arrived armed with a bunch of new features: Elastic Pitch, thirty new plugins, five new virtual instruments - Boom (drum machine), Mini Grand (piano), DB-33 (tonewheel organ), Vacuum and Xpand!² (synthesizers), as well as Structure Free and Eleven. Let’s take a closer look at this latest release from DigiDesign...
First glance
 |
While installing everything seemed to proceed normally. I chose my options and off it went! After a few minutes, I was asked to reboot the computer, which I did. Everything seemed ok…, well, almost everything. The old PT7 version was overwritten by the new version without any warning. It nevertheless kept my old plugins and extensions. Note that PT7 plugins work in PT8, and also vice versa!
I started the program up, but immediately ran into a problem. It crashed while trying to execute “stereo mixer.dpm” and “surround mixer.dpm”. I got rid of these files in the Plugins folder in Applications support. I re-started the software and it worked! Now during startup it checks for Digidesign product updates, and in the future it will also check for updates for certain brands’ plugins. One pleasant surprise: the LE version is compatible with the full range of Digidesign interfaces, from the Mbox 1 to Digi003 and TDM cards.
 |
Once past these startup issues, a new window appeared: “Quick Start” which manages the opening of sessions. So you can choose to create a new session from models (templates) that finally have their own extention (.ptt) and a folder to manage them, located in Applications/Digidesign/Pro Tools/Session Templates. You can therefore create many templates without the risk of overwriting them with a simple backup. There are basic templates for creation, recording and mixing. The different models are nice to start off with, but it’s better in the long run to take the time to create your own to have your specific routing and display. You can also create a blank session, open a recent session, while choosing different session attributes in the lower part of Quick Start. This can sometimes be slow, but you can choose whether or not to show Quick Start at startup, which is a good point. You can also open a session, while pressing “shift”, that will load the session without loading its plugins and therefore avoiding the many issues that can arise when there are no plugins installed on your machine. You should be aware that when you close a session, the plugins stay loaded in the DSP (HD version only), which speeds up the process when opening similar sessions.
 |
Once a session is started, you’ll finally discover the new graphic interface that looks softer and more curved. It’s nothing too extreme and you’ll be able to recognize your good old Pro Tools despite a trendy “glossy” look and sober colors. There’s a light gray background for the editing window and darker one for the Mix. Some people will be reminded of Logic, while others will think of Live or even Cubase. In any event, the colors are less aggressive, so staying in the studio for hours in front of your screen is less tiring for your eyes, and also for your morale.
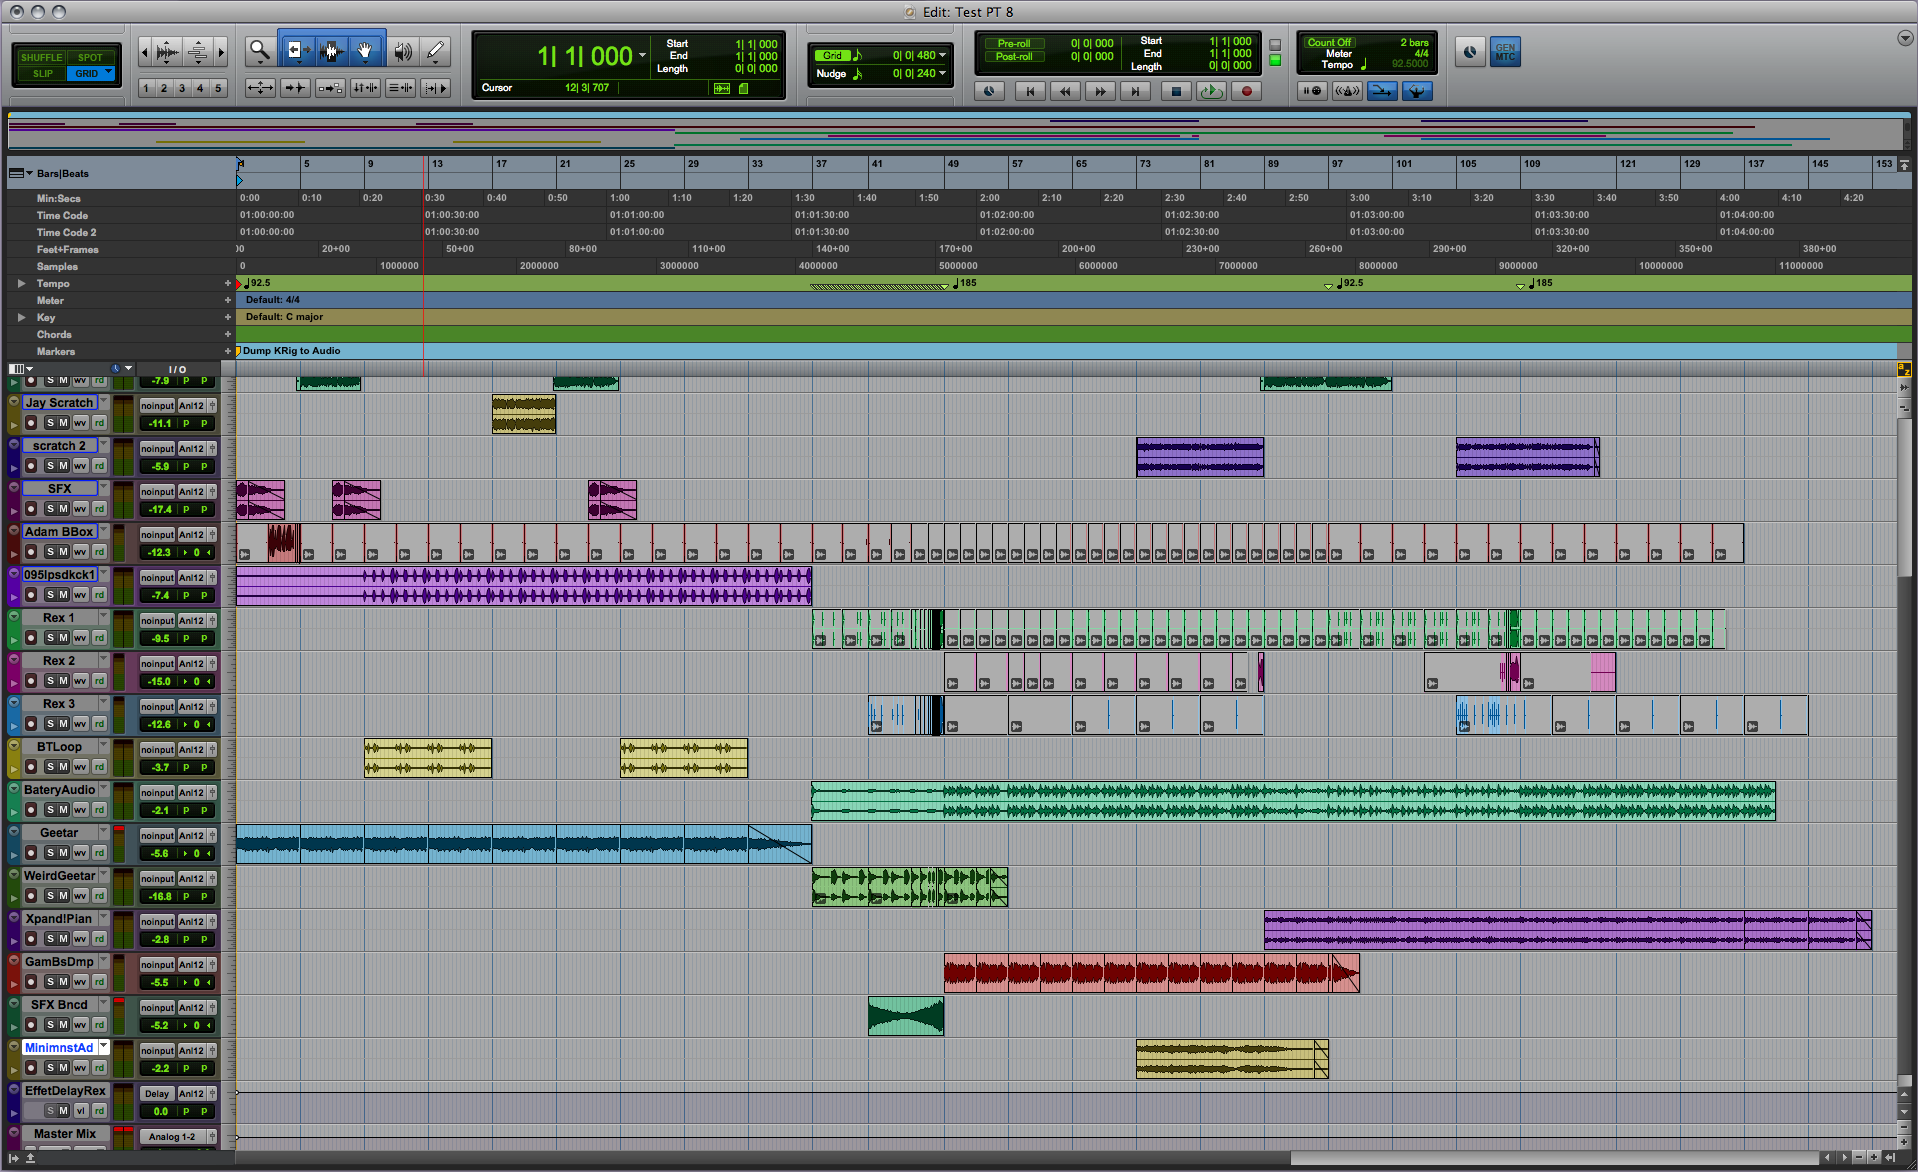
Edit
 |
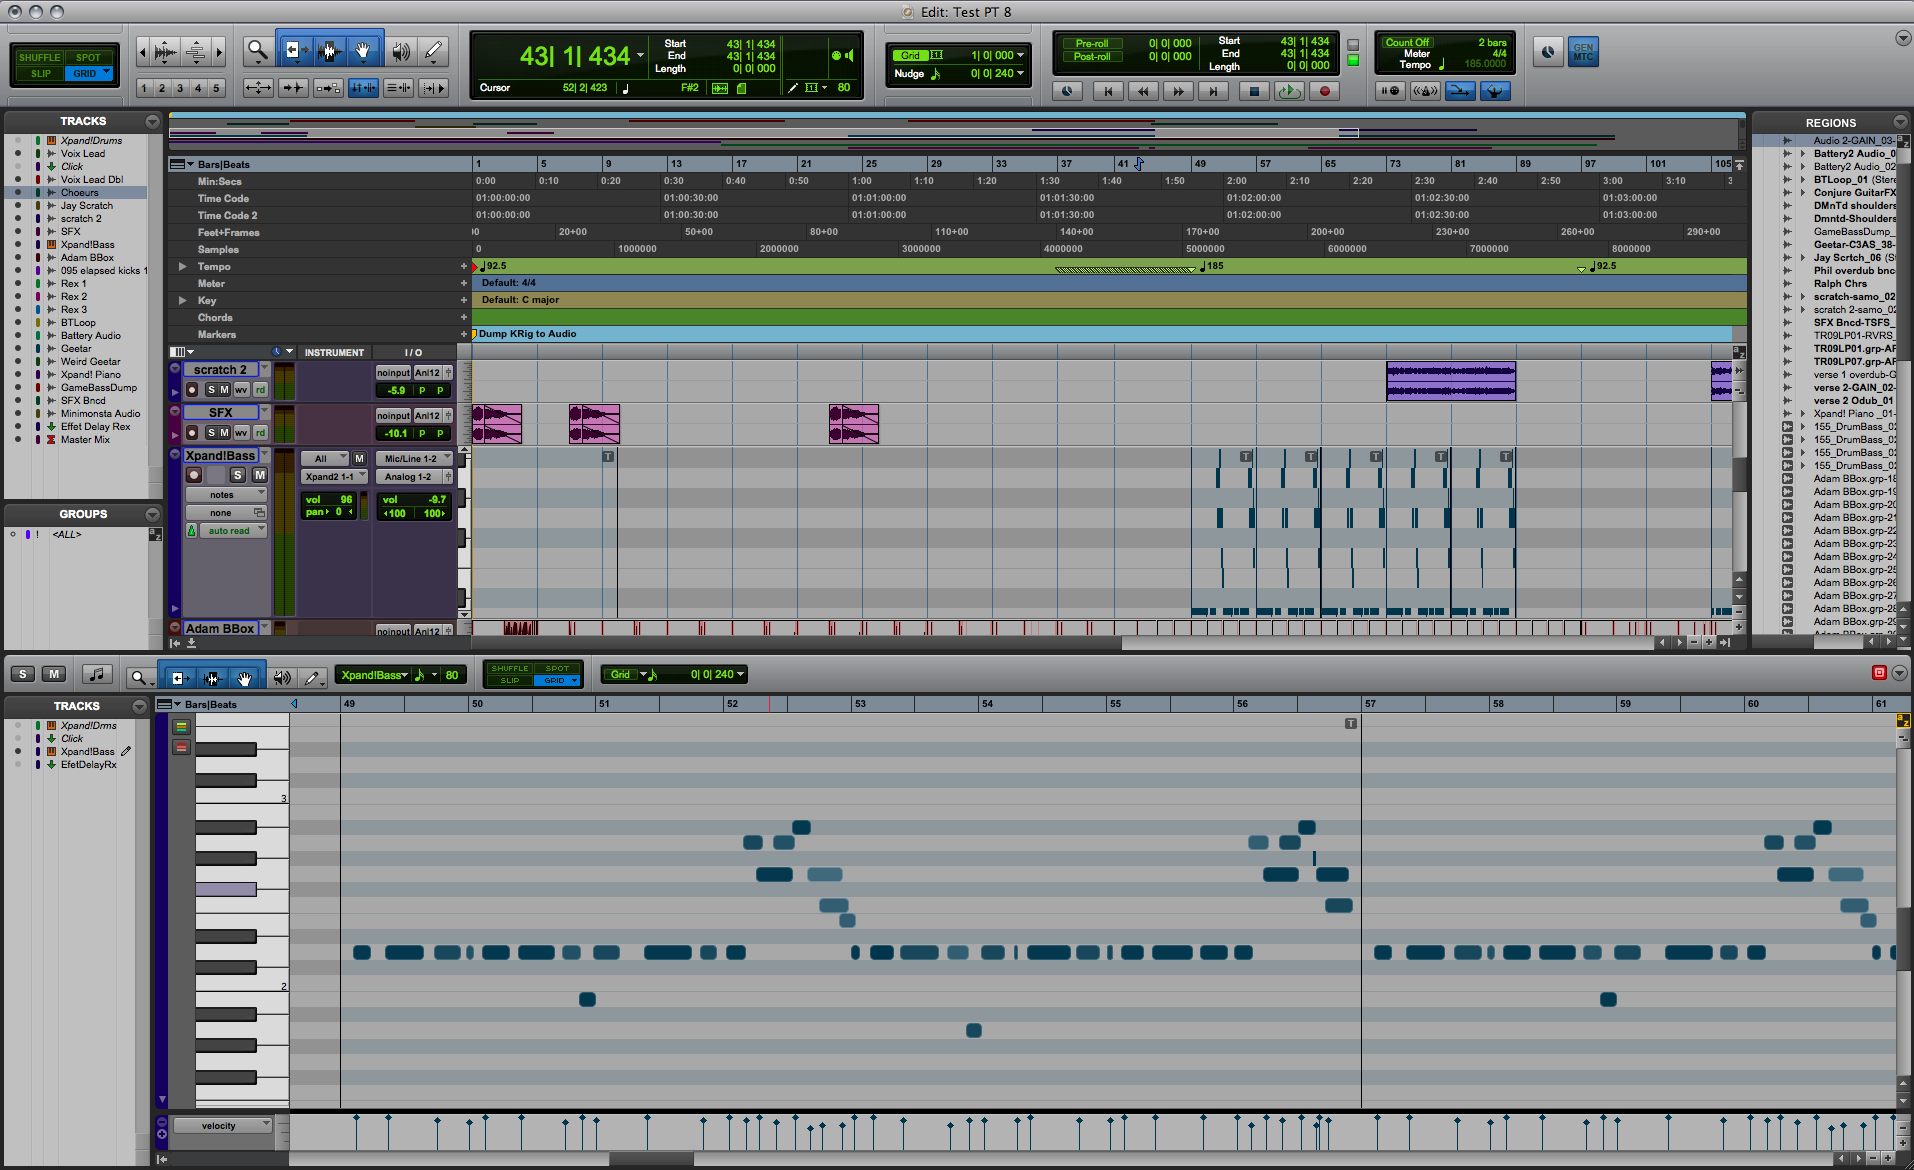
At the top of the edit window there are the different editing modes, zoom presets, tools, meter, selection indicator, and transport bar that can be customized anyway you want with a few clicks and the Command key. Some things have been moved: grid and nudge are displayed on the top right now. Under the tools are those which were primarily in the black bar (Tab to transients, etc.), and finally, the Timeline Insertion/play start marker follows playback (accessible also via the keyboard shortcut N ), which is very practical and avoids confusion. Vertical and horizontal as well as Audio and MIDI zooming can also be found above and below the scroll bars. The Transport bar is displayed in full which saves you the time of opening the transport window to enable certain options, especially on single screen computers. You can also now choose what information is displayed via the Edit Window Toolbar menu at the top right of the window. Underneath that there’s the “universe view”, which is inseparable from the Edit window. This view (which displays an overview of the entire session) is very handy, especially on cluttered and/or long sessions. Then there’s the different time display settings (counters), with a dynamic transport bar which can be adjusted during playback (but which causes a slight slow down). Track display is clearer with a larger font for track names. You can also display multiple automation playlists for a single track (like Cubase) and you can now see all of them while creating a session and/or mixing. Waveforms are displayed in 16-bit peak or RMS (8 bits for the wavecache of older versions) and can also be made transparent, so you can see the grid behind. No more long and arduous synchronizations! In addition, they can be displayed with or without outlines. There is a new arrow in the lower left, which will open the MIDI or Score editors, similar to Garage Band (more on this later). On the whole, the editing window is clearer and easier to read and will save time while editing and automating.
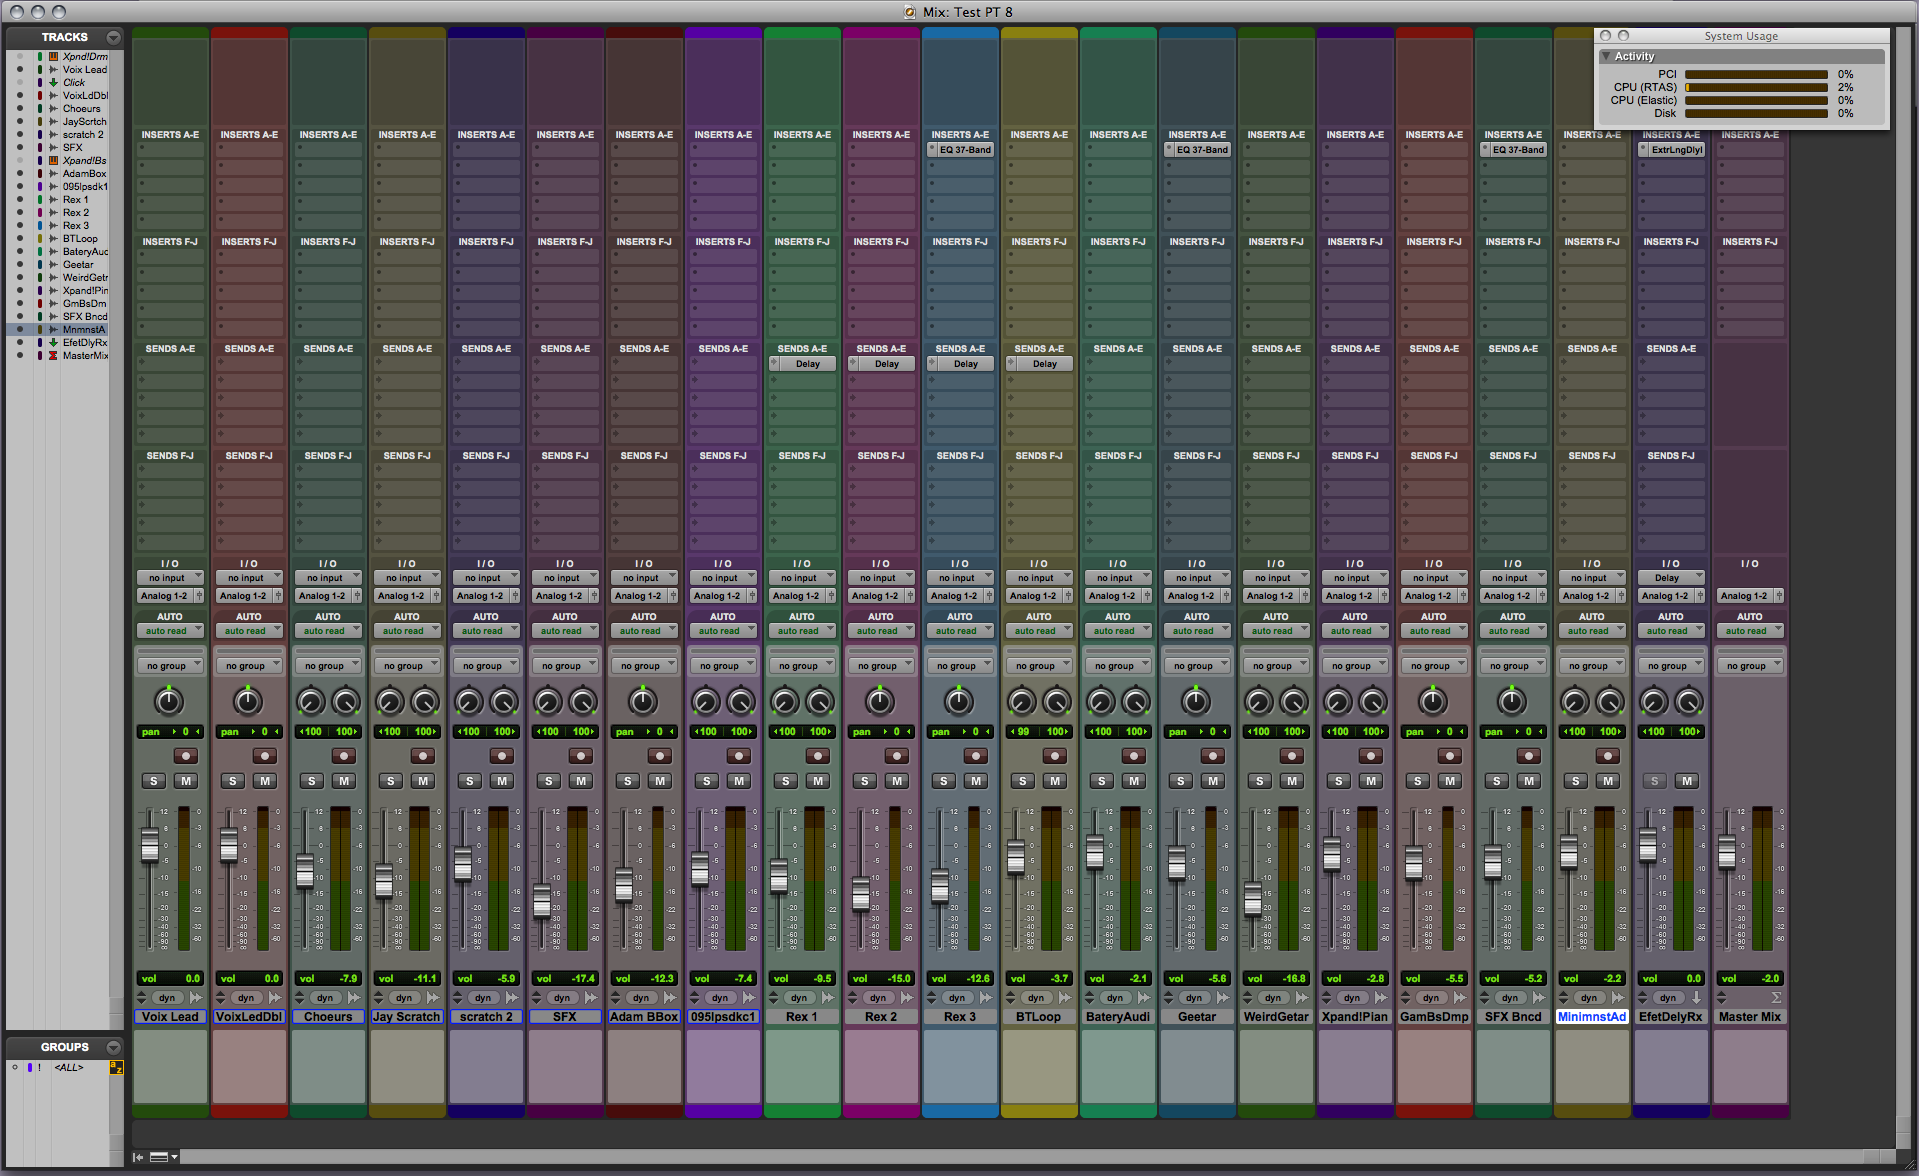
Mixer
In the mixer window, apart from the redesign of the various knobs and faders, the changes are more discreet. One thing to note is that “group” has its own button above the pan knobs, making it more distinct. Also, there’s the possibility of having ten inserts per track now. You can display the first five, the last five or all together, but note that massive use of inserts takes up a lot of CPU resources in PT and DSP in PT HD. With the improved color palette you can colorize and adjust the color saturation and brightness for channel strips. Generally, the Mix window looks nicer with its softened contours and easier readability.
MIDI editor
 |
And here’s the new MIDI editor, which can be displayed in the Edit window or in a separate window, like with Garage Band or Cubase. In both of them there are the same set of functions and tools as in earlier versions, plus some new ones like separate, eraser (Ctrl – Shift), setting an insertion point at the front of the note or the back (with Ctrl), and the Chords ruler in the timeline to display chords in tablature. Editing MIDI is now pretty much similar to other apps. Notes are more or less darkened according to their velocity, or their instrument, and can be muted (like in Cubase). But strangely enough you can’t see the layering of notes that are the same size. There’s no Drum Map. Scrolling can be locked in with the Edit window. Same for zoom levels, grid value, tools and editing modes (Shuffle, Spot, Slip and Grid). That’s really handy! On the other hand, you still can’t transpose one or more notes with the arrow keys, (not so handy). Solo and mute buttons for MIDI have been added. You can go to a full-screen editor window by right clicking on it. A button or keyboard shortcut would have been just as nice. As for new features, you can display multiple MIDI programming and choose to write in one of them. I won’t be talking about the MIDI environment, because there isn’t one. MIDI Beat Clock can be advanced or delayed through offsets. The button with a note icon, top left, brings you to the score editor. This MIDI editor is getting better, but will continue to improve, hopefully, in the near future.
 |
Score editor
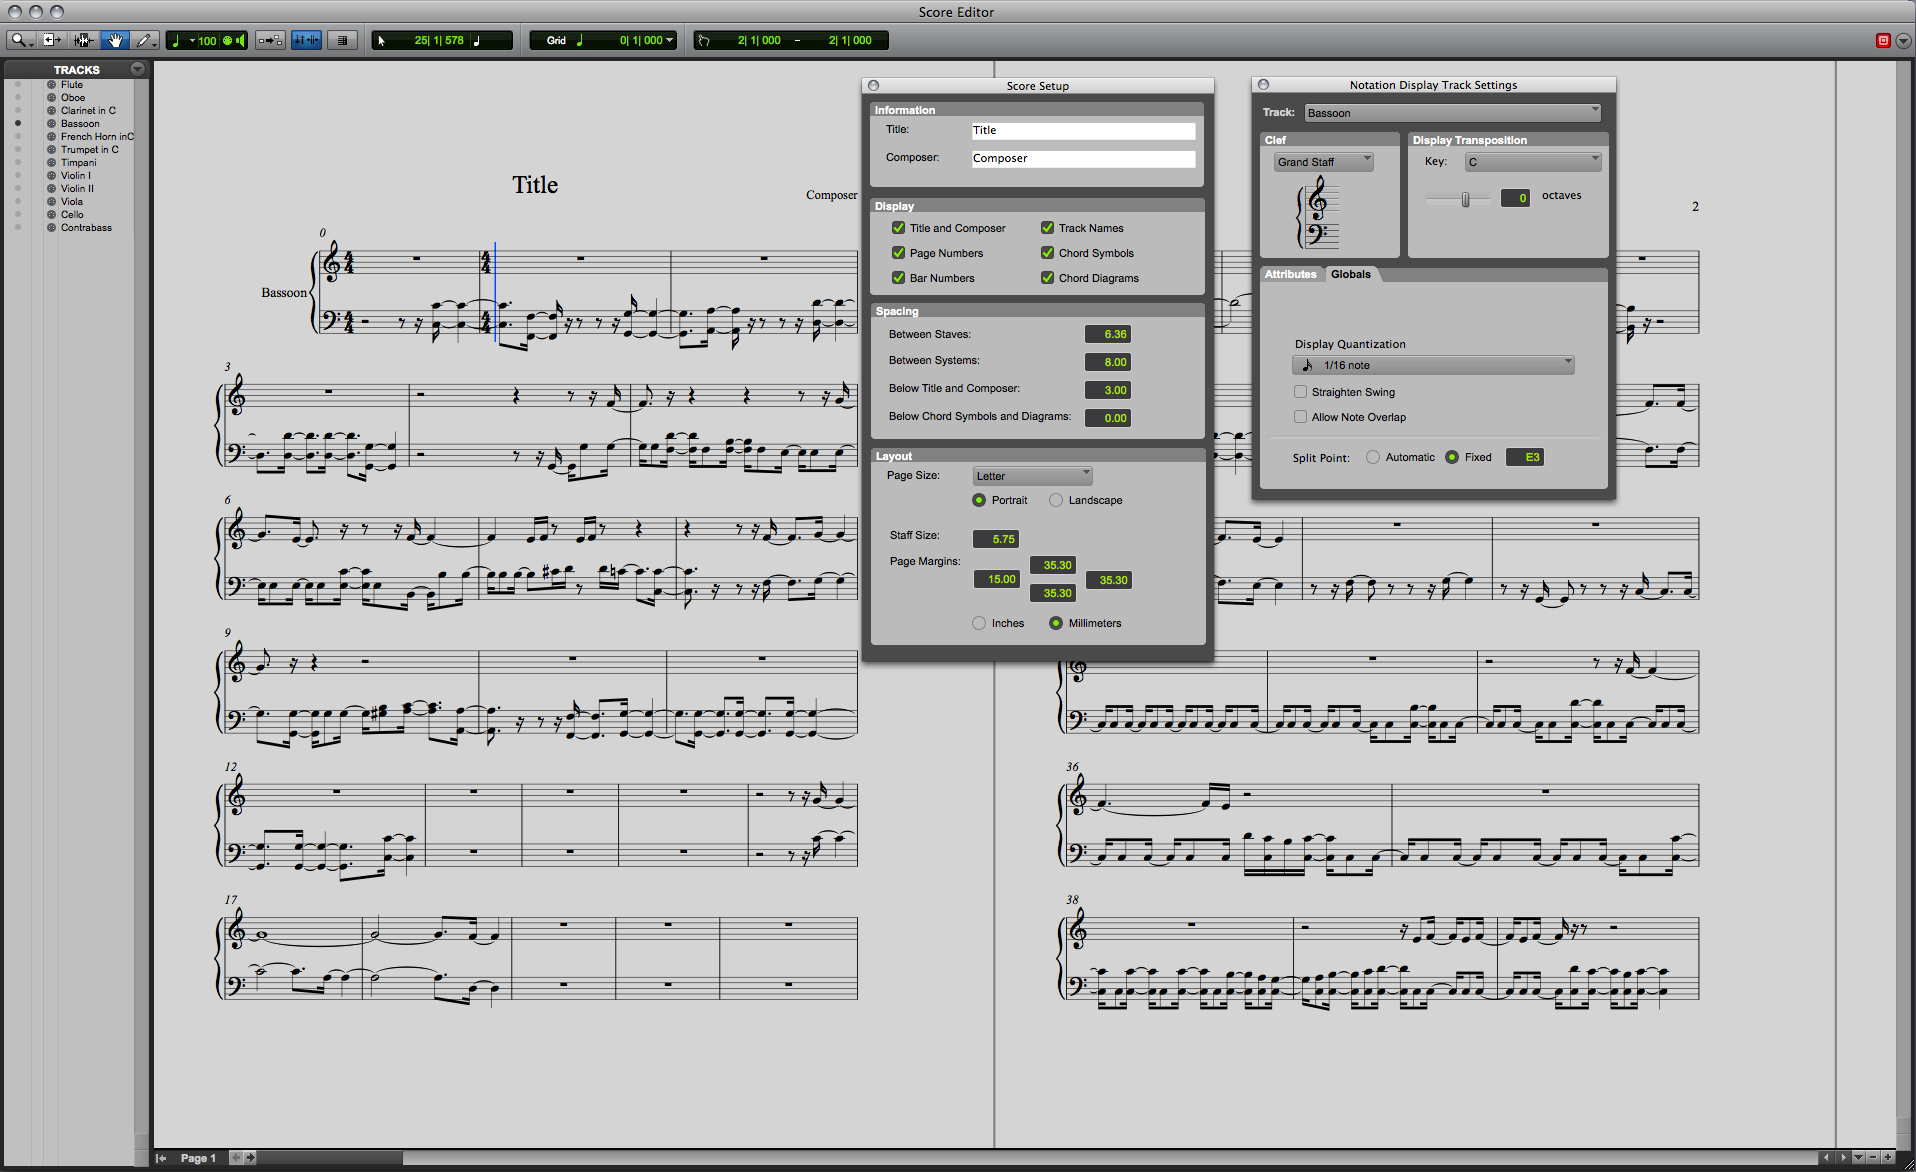 |
The score editor uses the same engine as Sibelius (a Digidesign acquisition since version 5), which lets you export to the latter in the proper format. Just like MIDI edit, you can access it in the Edit window or in a separate window. Nevertheless, it slows down your machine. So it would be better to write in MIDI and Score in the final phase, which is annoying when you want to compose while writing notes. Moreover, it’s not possible to write under the staff (like annotations or lyrics). Of course Digidesign can’t and won’t compete with Sibelius, in part because the latter belongs to the brand. This Score edit contains basic functions, the necessary clefs and layout features. It is nevertheless very basic, but practical and relatively user-friendly, so it will suffice for some.
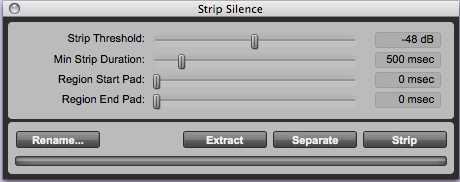
It should be noted however that the Strip Silence now works in 16 bits, with a strip threshold of 96 dB instead of the previous 48, which will allow more precision. The remaining windows look the same, just slightly redesigned like the rest of PT8.
 |
In the end, the main windows, overall, have evolved. Let’s see now how PT8 works in use.
Because I had no right to show the software to anybody before December 17 and because I received it about a week and a half before that, it was difficult to test it in a recording session. I therefore tried to put it through its paces until that time came.
Recording
 |
I tested up to 128 simultaneously recording tracks in mono in LE and … it works! (up to192 tracks at 44.1 kHz or 48 kHz in the HD version). I just had to lower the hard disk access time in the playback engine (level 4) and not access the hard disk while recording. This operation is possible with PT8 LE even though you can’t put that many sources into LE interfaces. But finally there’s no more 32 track limit (or 48 with the DV Toolkit) as in previous versions! This was especially a problem when sessions needed more tracks than the allowed limit. In addition, recordings can now last longer, PT8 is able to handle files of up to 4GB. Another new feature: comping, which allows you to automatically create separate playlists when loop recording, and then ‘promote them’ from those tracks into a new play list, like with Logic or Cubase. You can display takes by right-clicking on the recorded region. The alternate takes are under the main one in lanes and you can rate each one. The possibility of promoting one to the desired play list saves a lot of time. Unfortunately, the Loop Rec still doesn’t take pre-and post-roll into consideration after the first take. Hiding playlists is done using Ctrl and Command and clicking on the playlist selector. A new keyboard shortcut which activates the track(s) (contained in a selection) for recording is now available with Shift + R. There are still no keyboard shortcuts for creating a new playlist, which is really lacking, especially on sessions where time is of the essence. Except for the new comping and key binding features, recording is similar to what is was in the last version.
Audio editing
There’s a new feature available for audio editing: “restore last selection”. This lets you restore the last selection you made if you happened to lose it by accidentally clicking somewhere else, which can really come in handy sometimes. Just like for Record, keyboard shortcuts for Solo and Mute have been implemented (Shift S and M). We’ve been waiting a long time for them. You can lock regions in two ways: while editing, you can’t move nor delete them without having a warning pop-up dialog box. Before you could delete a region without warning just by covering it with another. And you can lock it in time, which means that you can only move it vertically. Unfortunately, it still deletes a region or a part of one when you cover it completely or partially with another region. We should be given the choice. AudioSuite has a new management system and has a faster preview feature. Unfortunately, there’s no direct access to AudioSuite by right-clicking on the region, despite an improvement in the right click menu. Elastic Time is still as effective and now has a little brother: Elastic Pitch, which allows real-time region transposition with good audio quality. For the rest, no change.Mixing
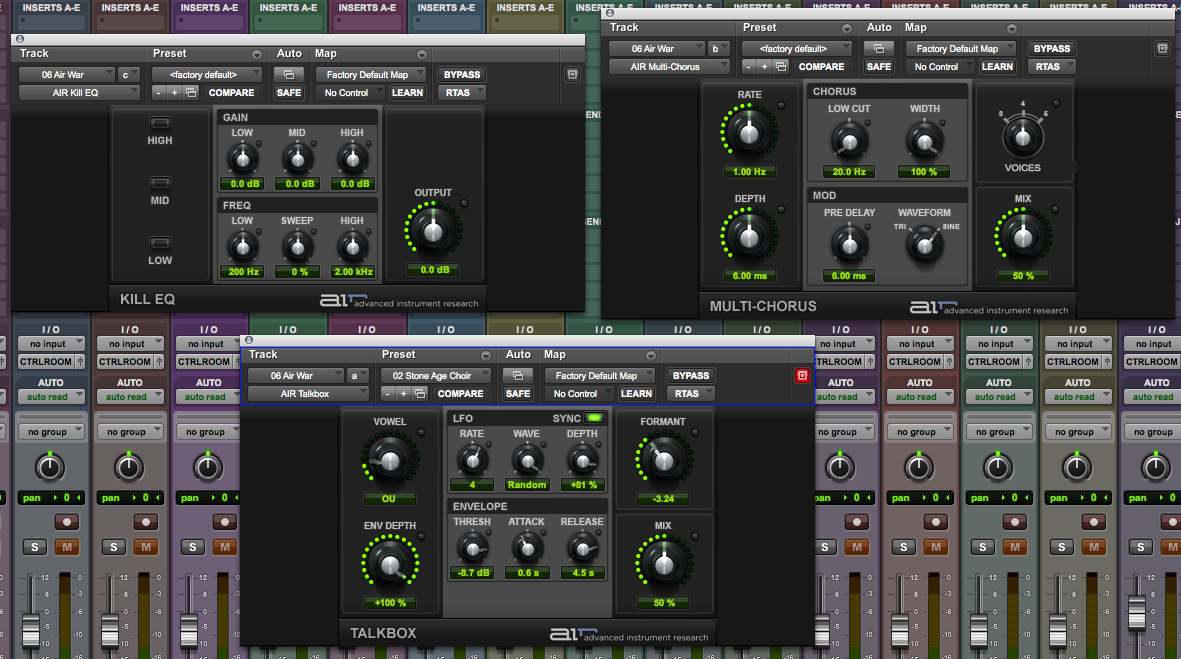 |
Mixing has received notable improvements such as 10 inserts per track (instead of 5), but there’s no information about the audio engine (secret), it seems to be the same one as before (to be confirmed). The inserts let you treat your sound with plugins, and there are thirty new AIR, RTAS, and TDM plugins, of relatively good quality to choose from. Most of them are very good like Kill EQ, Vintage Filter, TalkBox, Flanger, Chorus, Dynamic Delay, Reverb and the list goes on and on. Unfortunately, they all look the same, which is confusing at times. A second more comprehensive metronome, TL Metro, is now provided, as well as Maxim the Maximiser/Limiter. A user plugin-mapping feature is available at the top of every plugin window, so you can therefore map plugin parameters to knobs or controllers of your control surface and save the configuration. In this way, you can get direct access to settings that you often need to use. I haven’t had time to test them with control surfaces other than Digidesign ones. It’s regrettable that you can’t copy all plugins at the same time from one track to another with one simple click or keyboard shortcut. The mix window is easier to use and read, which is less tiring on long sessions. An effort has been made to meet the lack of native plugins that existed in older versions and also on ergonomics. The automation modes have not changed.
Virtual Instruments
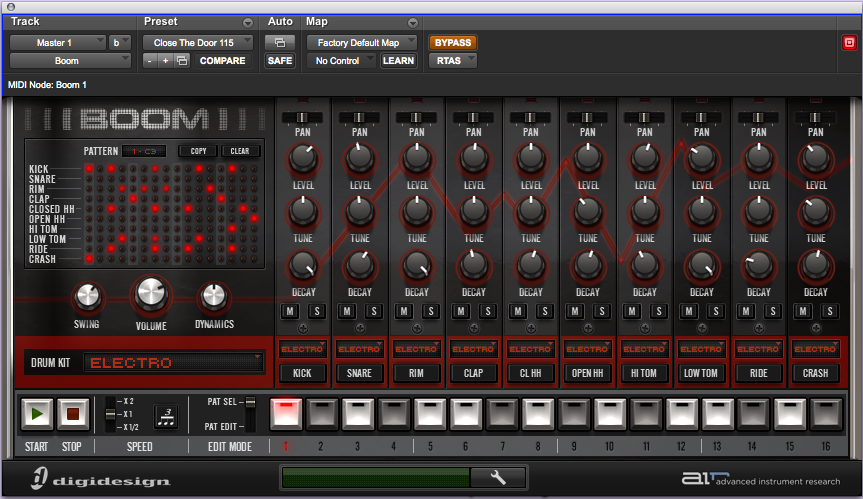 |
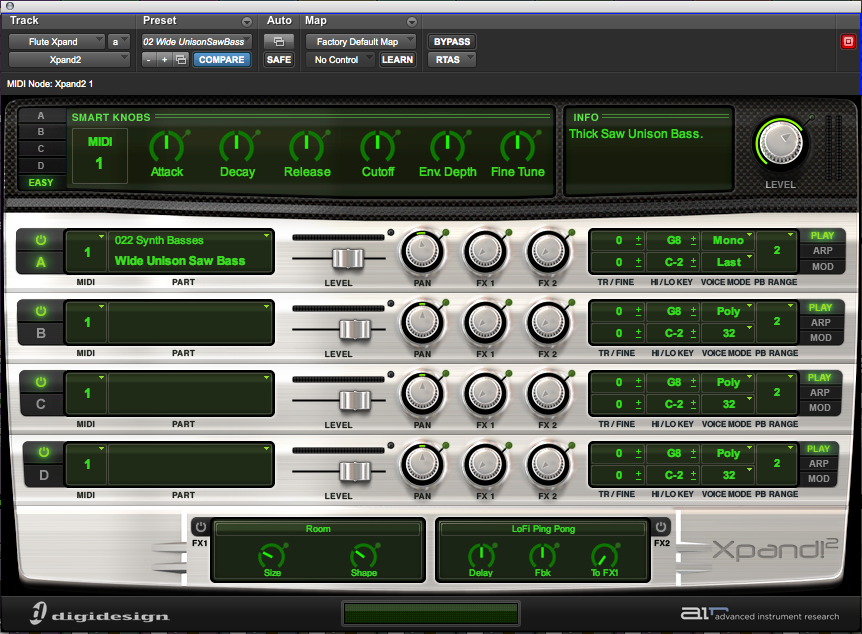
Five new virtual instruments come with the Pro Tools Creative Collection: Boom (drum machine), Mini Grand (piano), DB-33 (tonewheel organ), Vacuum and Xpand!² (synthesizers).
Boom, as its name suggests, is more electro oriented. It has a pattern editor, a single MIDI channel and no drum map. You can’t import your own sounds.
 |
Mini Grand is a virtual piano that’s quite good, with 64 note polyphony and 30 presets ranging from dry piano to piano with reverb.
 |
DB-33 is a tonewheel organ, an emulation of a Hammond B3 (with drawbars), which you can also use as an effect on other sounds in order to take advantage of its rotary speaker cabinet. It’s therefore quite interesting since it’s in reality two plugins in one.
 |
Vacuum is an analog Moog-like synth which uses vacuum tube synthesis, quite aggressive, perfect for energetic instrumentals. Xpand² features four midi channels (one per unit) and an extreme face-lift.
 |
Conclusion
PT8 has been developed to attract those who still have reservations or who use other sequencers. The virtual instruments sound good, which makes you want to use them. Plug-ins are much more numerous and sound surprisingly good. You still can’t export preferences with a session other than with Finder, but this is a small detail. Templates, that you’ll need to take the time with to record display configuration, tracks, routing, and other features, will be a real time saver in the long run. The Arrange function allows you to store all windows in cascade or tile, this has been used in a lot of other software. PT8 has had a considerable face-lift with its new design that’s not bad, especially for long sessions. Ergonomics are in general very nice and remain coherent with earlier versions. Omnipresent in professional audio and video, Digidesign is now targeting, more than ever before, home studios, composers, musicians and DJs … basically, everybody who makes music, because they would henceforth be able to export demos to a professional studio project using the same software. A multitude of small improvements make it a very serious competitor of other sequencers. It’s therefore a complete music production tool from start to finish.
[+] New GUI
[+] Alternate playlists
[+] MIDI and Score editors
[+] New keyboard shortcuts
[+] 48 track support (LE & M-Powered)
[+] Template management
[+] Virtual instruments
[+] AIR plugins
[+] MIDI offset Beatclock
[-] AIR plugins – GUI too similar
[-] No keyboard shortcuts for creating playlists
[-] Score editor slows the system down in writing mode (LE)
[-] No latency management PT