I was driving along one of those Floridian roads that goes between the coasts, and is flatter than the Spice Girls without auto-tuning . . . in other words, a perfect place to crank up my car's CD player. As it segued from a recent CD into Simple Minds' "Real Life," which I hadn't heard in a while, I noticed it was somewhat quieter, so I turned up the volume.
And in the process, I got to experience dynamics, like they used to have on CDs back in the 80s. Much has been said about the evils of overcompression, but we’re so used to it that sometimes you need to hear great music, intelligently mixed without excessive compression, to remember what we’re missing.
Dynamics are an essential component of a tune’s overall emotional impact. Yet some engineers kill those dynamics, because “everyone else does it, ” and they don’t want their songs to sound “weak” compared to others. So we’re stuck in a rut where each song has to be louder than the last one—listener fatigue, anyone? I sometimes wonder if the decline in sales of recorded music has something to do with today’s mastering style, which makes music that although loud, is ultimately not that much fun to listen to.
So what’s an engineer to do? Compromise—find that sweet spot where you preserve a fair amount of dynamics, but also have a master that’s loud enough to be “in the ballpark” of today’s music. The following tips are designed to help you do just that. Maybe your tune won’t be quite as loud as everyone else’s, but I bet it will elicit a more emotional response from those willing to turn up their volume control a bit.
Nuke the Subsonics and DC Offset
Digital audio can record and reproduce energy well below 20 Hz from sources like downward transposition/pitch-shifting, and DSP operations that allow control signals (such as fades) to superimpose their spectra onto the audio. While inaudible, they still take up headroom. You may be able to reclaim a dB or two by simply removing everything below 20 Hz. However, note that if you can find individual tracks that contribute to a subsonics problem and do any needed fixes while mixing, this eliminates the need to add filtering on the entire tune.
Another culprit, DC offset, reduces headroom because positive or negative peaks are reduced by the amount of offset. Removing residual DC offset, using the “Remove DC offset” function found in most digital audio editors, “centers” the waveform around the 0V point, thus allowing a greater signal level for a given amount of headroom.
Do You Really Need Mondo Bass?
As the ear is less responsive to bass frequencies, there’s a tendency to crank up the bass, especially among those who lack mixing experience. Reducing bass can open up more headroom for other frequencies.
To compensate for this and create the illusion of more bass:
- Use a multiband compressor on just the bass region. The bass will seem as loud, but take up less bandwidth.
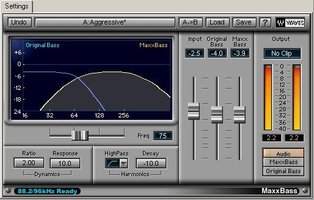
- Try the Waves MaxxBass plug-in (a hardware version is also available), or the Aphex Big Bottom process. MaxBass isolates the signal’s original bass and generates harmonics from it; psycho-acoustically, upon hearing the upper harmonics, your brain “fills in” the bass’s fundamental. The Big Bottom process uses a different, but also highly effective, psychoacoustic principle to emphasize bass.
The WAVES MaxxBass isolates the signal’s original bass and generates harmonics from it. You can then adjust the blend of the original bass with the bass contributed by the MaxxBass.
Find and Squash Peaks that Rob Headroom
Another issue involves peak vs. average levels. To understand the difference, consider a drum hit. There’s an initial huge burst of energy (the peak) followed by a quick decay and reduction in amplitude. You will need to set the recording level fairly low to make sure the peak doesn’t cause an overload. As a result, there’s a relatively low average energy.
On the other hand, a sustained organ chord has a high average energy. There’s not much of a peak, so you can set the record level such that the sustain uses up the maximum available headroom.
Entire tunes also have moments of high peaks, and moments of high average energy. Suppose you’re using a hard disk recorder, and playing back a bunch of tracks. Of course, the stereo output meters will fluctuate, but you may notice that at some points, the meters briefly register much higher than for the rest of the tune. This can happen if, for example, several instruments with loud peaks hit at the same time, or if you’re using lots of filter resonance on a synth, and a note falls within that resonant peak. If you set levels to accommodate these peaks, then that reduces the song’s average level.
You can compensate for this while mastering by using limiting or compression, which brings the peaks down and raises the softer parts. However, if you instead reduce these peaks during the mixing process, you’ll end up with a more natural sound because you won’t need to use as much dynamics processing while mastering.
The easiest way to do this is as you mix, play through the song until you find a place where the meters peak at a significantly higher level than the rest of the tune. Loop the area around that peak, then one by one, mute individual tracks until you find the one that contributes the most amount of signal. For example, suppose a section peaks at 0 dB. You mute one track, and the peak goes to 2. You mute another track, and the section peaks at 1. You now mute a track and the peak hits 7. Found it! That’s the track that’s putting out the most amount of energy.
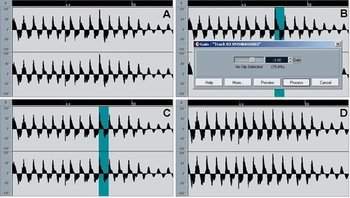
Referring to the following diagram, zoom in on the track, and use automation or audio processing to insert a small dip that brings the peak down by a few dB. Now play that section again, make sure it still sounds okay, and check the meters. In our example above, that 0 dB peak may now hit at, say, 3 dB. Proceed with this technique through the rest of the tune to bring down the biggest peaks. If peaks that were previously pushing the tune to 0 are brought down to 3 dB, you can now raise the tune’s overall level by 3 dB and still not go over 0. This creates a tune with an average level that’s 3 dB hotter, without having to use any kind of compression or limiting.
((A) shows the original signal. In (B), the highest peak has been located and is about to be attenuated by 3 dB. © shows what happens after attenuation – it’s now only a little higher than the other peaks. In (D), the overall signal has been normalized up to 0.00 dB. Note how the signal has a higher average level than in (A) – all the other peaks are higher than they were before – but there was no need to use traditional dynamics processing.
Cheat !
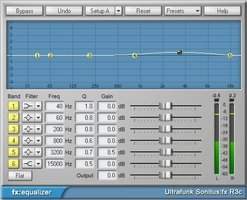
The ear is most sensitive in the 3–4 kHz range, so use EQ to boost that range by a tiny amount, especially in quiet parts.
Some equalizers let you adjust the graph’s vertical resolution, making it easier to see tiny amounts of EQ. Here, a very broad, 0.5 dB boost has been added at 3.2 kHz.
The tune will have more presence and sound louder. But be extremely careful, as it’s easy to go from teeny boost to annoying stridency. Even 1 dB of boost may be too much.
If you still need something slightly hotter, bring on a level maximizer or high-quality multiband compressor. However, by implementing the level maximizing tricks mentioned above, you won’t need to add much dynamics processing. If you’ve been adding, for example, four to six 6 dB of maximization, you may be able to get equally satisfying results with only one or two dB of maximization, thus squashing only the highest peaks while leaving everything else pretty much intact.
A final consideration involves mastering for the web. While some engineers add massive amounts of compression to audio that will be streamed, in practice data compression allows for a reasonable amount of dynamics. If you’re streaming audio, then the sound quality is already taking quite a hit, so preserving dynamics can help make the music sound at least a little bit more natural. If you work with streaming audio, try the techniques mentioned above instead of heavy squashing, so you can judge whether the resulting sound quality is more satisfying overall.
Originally published on Harmony Central. Reprinted by permission.


