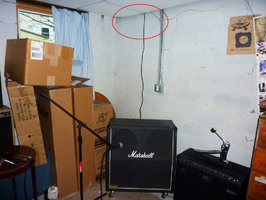
For recording guitarists, one benefit of a head-and-stack configuration over a combo is that you can separate the amplifier from the speaker cabinet and run a long cable between the two.
A speaker-level signal can travel a longer distance than can a guitar cable, so in a remote recording situation that requires really loud levels, you’ll sometimes see a head and cab in widely separated places. The head can be in the control room, for example, close to the performer, who monitors through headphones or on the studio monitors. The miked cabinet is then placed in the live room, a safe distance away and separated by double-pane glass. The live room often has a desirable ambient sound, which can also be miked and mixed into the close-miked signal (which is the normal way to record guitar cabs).
But home recordists can emulate this setup as well, though perhaps with not quite the elegance of a control room for performance and a live room for hosting the cab and a mic. If you have a head and cab, consider separating them and connecting the cab through a long speaker cable (use a tape measure to estimate the separation distance, and make your purchase accordingly). Then mic the cab and monitor the sound through headphones. The better isolated the cab is, the more pure your monitor sound will be. And one of the best ways to isolate the sound of a cab is to move it further and further away from your years. Insulation and soundproofing are good, but since sound level diminishes as a function of the inverse square of the distance, turf is what counts here.
Remote miking on the cheap
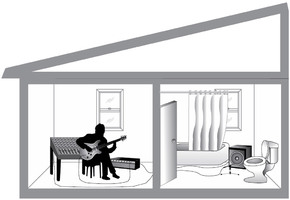
Fig. 1 shows a schematic of the basic separation principle. The performer is in one room with his amp head close by. In the next room is the cabinet. Having the speaker in a bathroom (as is the case here) has the additional benefit of contributing a nice, natural ambience, courtesy of the tile floors, porcelain fixtures and hard walls.
Note that in Fig. 1 there are three cables involved. In order from short to long, there’s 1) the guitar cable that plugs into the amp. This you want as short as possible, preferably no longer than 20 feet. That’s obviously no problem here. 2) Next is the speaker cable, which travels from the back of the head (here on the right side as you face the head), out the door, and into the next room where it plugs into the back of the speaker cabinet. 3) Last is the mic cable, which travels all the way from the mic in front of the cab, back through the open door, along the foreground of the room, and up the left side of the mixer. If the performer can squeeze the door shut (with the two cables between the bottom of the door and the floor), he’ll have an easier time monitoring the sound over headphones or studio monitors.
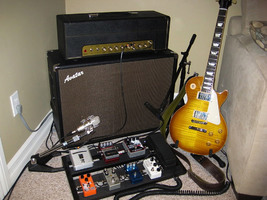
Running cables between rooms works surprisingly well. Of course, you can always augment the distance advantage with insulation or even simple padding. Fig. 2 shows a miked amp in a corner, buttressed on one side by a big couch. Note that here the head sits on top of the cabinet, eliminating the need for a long speaker cable. For set-and-forget situations, or where you won’t be tweaking the amp knobs often, you can keep the components together. And this is the scenario for using a combo, where you can’t separate the amp controls from the speaker.
Home Improvement
If you own or otherwise can alter the floors and ceiling of a multi-storey dwelling, you can put the cabinet on a different floor. For example, with the amp and recording setup in a first-floor den or family room, you could pass a cable to the basement room directly below, where your cabinet will live. It doesn’t matter what room is in the basement—it could be a garage, a laundry room, or the utility closet housing the furnace. As long as the cabinet fits in the space directly below (or nearby) the hole, you’re fine.
What you’ll do in the split-storey scenario is either run the cable outside, through open windows (better for temporary situations), or drill a small hole in the floor (and through the ceiling of the room below, if necessary). You’ll then pass a speaker cable through the hole to connect the head with the cab. If your mixing board is near the head, you’ll also pass a mic cable—the one connecting the mic and the mixer—through this hole as well. Needless to say, this is a permanent, aesthetic modification to your floor, so careful thought must be applied—and permission granted—before embarking on this particular home improvement.
But more and more, holes are getting drilled into floors to accommodate cable communications, especially when retrofitting older dwellings, which don’t have the cable built into the walls. A first-floor-to-basement connection is ideal because the ceiling in most basements isn’t aesthetically pristine nor hard to break through, as one between, say, a first and second floor. In my own case, my basement has just a drop ceiling with acoustical tile. If you remove a tile, you see the floor joists and the exposed floorboards of the room above. With an assistant, we determined the ideal location from both above and below, and avoided having to drill through a joist in the process.
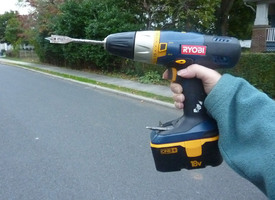
To get through the floor, you need any battery-powered cordless drill with a router bit. Choose the bit based on the size of the hole you need to make. Note that my drill (see Fig. 3) is an 18V, but you don’t need one that is quite that powerful. A smaller, 14.4V drill will do the job fine. The bit pictured here is a 5/8" router.
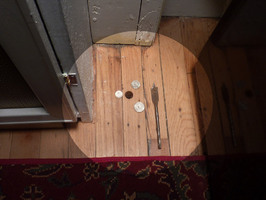
Very important tip: Before you drill anything, consider that you only need the hole to be big enough to pass the actual cable through, and not the connector (usually an XLR) and the cable. To make the smallest hole in your floor possible, first remove the connector by de-soldering all three leads. Pass the cable through, then re-solder the connector on the receiving end, on the other side of the obstruction (floor and/or wall). In my own case, I wasn’t concerned with making an absolutely minimum-sized hole, because the hole location was in a corner that would eventually get covered with carpet. Fig. 4 shows the hole with the carpet pulled back.
My 5/8" router bit makes a hole that is only slightly larger than the diameter of a dime. This will easily accommodate two cables with no threat of binding (though the cords are more or less permanently placed). But you can make the hole even smaller if you like. If you really need to go small, and you’re not sure of the diameter, practice making holes in a scrap piece of wood, and fit your particular speaker (and mic) cable through the hole to ensure the fit. You might be able to use a normal drill bit depending on the diameter of your speaker (and mic) cable.
Fig. 5 shows what’s under the hole in the floor on the storey above. Hey, it’s my basement, full of junk (some of it musical). But this room is basically for storage and remains largely unoccupied—especially when the 100-watt head is exercising the 4×12 speaker cabinet! When I use this setup, I listen to the mic signal that comes through the headphones. I’m not in the same room—or even on the same floor—as the cabinet. This allows me to get a good, authentic sound out of the amp and cab (read: I can play really loud) without blowing out my ears. With headphones on, I’m only faintly aware of the subterranean rumbles below, as the cab vibrates the floor underneath my feet.
Conclusion
In many cases you’ll want to use high volumes from your amp to inspire a performance or to facilitate feedback. But there are often times when it’s just as beneficial to separate the performer from the thing making an unholy racket. Whether you use a head and cab or a combo, consider separating the performer from the amp—especially if you have to play and record simultaneously. While it requires an adjustment, when you’re the engineer as well as the performer, you’ll get a more objective picture of what’s going to disc from headphones or studio monitors than from the actual sound coming out of the cab.
This article was originally published on Harmony Central. Reprinted by permission.


