

Finding an acceptable level of latency is something everyone making music with computers must deal with at times. For some of us it's child's play, but for some others it can get complicated very quickly, especially for beginners who can end up spending more time dealing with computer matters than making music. Today we'll see how to solve a pretty common problem in the simplest possible way.
Take your time…
Before we start, you should know that there’s no one-size-fits-all setting regarding latency. Indeed, as is usually the case with computer music, it’s all a matter of compromise between the hardware performance and the needs of the user at any given time. Furthermore, singers, guitar players, pianists, and even sound engineers, all have different tolerances when it comes to the delay caused by latency.
Oversimplifying things, you could say that, generally speaking, a delay of about 10ms is good enough for everybody. Below that it’s even better, because it’s almost imperceptible, while above that some people might be annoyed or distracted. Above 20ms, it becomes almost unmanageable. These are merely subjective indications based on general experience.
To adjust the latency time, and thus the buffer size (see the previous article), you need to access the audio interface or soundcard settings. Depending on the manufacturer/developer, you can access them via a program installed together with the drivers, or via an “ASIO interface, ” “Control Panel, ” “Buffer Size, ”Buffer Settings, " or similar button from within the audio preferences of the DAW.
As an example, here’s the Audio Preferences window in Apple Logic Pro X:
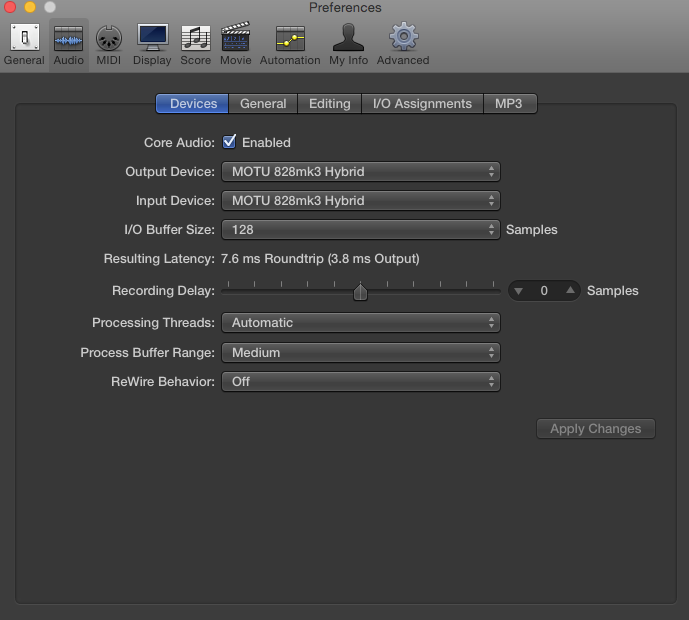
It’s up to you to read your soundcard’s and/or DAW’s manual to learn the exact procedure, because each manufacturer/developer offers different options. In any case, there will certainly be a button or a slider that allows you to change the size of the buffer.
You only need to adjust the corresponding value (64, 128, 256, 512 samples, etc.) so that the latency indicated by your DAW is close to the coveted 10 ms.
In the image below you can see three interfaces of different manufacturers (Roland, Native Instruments and T.C. Electronic).
 |
 |
 |
Be sure to take note of the round-trip value, which corresponds to the total delay produced by the hardware. Also note that, the higher the sampling frequency (48, 96, 192 kHz…), the lower the latency time with the same buffer value. Also note that the result can vary a lot from manufacturer to manufacturer (we’ll see why in a future article).
Trial and error
After you’ve made your settings, you need to test them out: Playing back and recording an instrument is a good way to “feel” the delay. If you don’t have a “real” instrument at hand, you can also use a virtual equivalent with a controller.
A quick tip: Activate the metronome on your sequencer and see if you can play right on the click. That will help determine if the settings suit you well or not. Once you’ve found acceptable settings, write them down for future reference, and start working on your projects.
And then what?
The goal of these tests is to find your own threshold. That’s why you need to do your testing “clean, ” with one single instrument, virtual or not, and without any plug-ins, because they can add more latency to the overall value.
Working on a full project will obviously put much more strain on your hardware gear. And that’s why, in a future article, you’ll learn how to “stress” and analyze your setup in order to find out how much data it can handle, according to the “ideal” buffer value you have defined.