

Waves Abbey Road Studio 3
Quick Overview
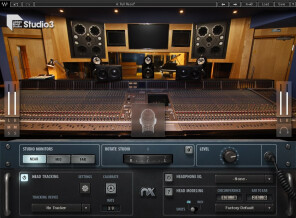
Waves paired up with the team at Abbey Road Studios again to bring us Abbey Road Studio 3. Based off of Waves NX technology, this new plugin is modeled off of studio 3's control room. This includes the 3 sets of monitors in the control room which you can switch to any via a button click. Stereo and Surround Components are both included. You can mix up to 7.1 when using the surround component.

Waves Head Tracker
If you do not have the Waves Head Tracker, you can still use a webcam. It generally works well but it can have its hiccups. I do not own the Head Tracker but from everything I have read, the combination of webcam and Head Tracker provide the best results in terms of tracking ones head movements. You also want to make sure that you input your head measurements into the plugin. This has a drastic difference on the sound.

Who is This For?
This is a fantastic plugin for everyone, but even more so for the many of us who do not have multiple sets of monitors, the greatest sounding rooms, or work on the go with headphones.
Test Drive Abbey Road Studio 3
You can download a demo from Waves website and take it for a test spin to see if it is right for you. I also did a tutorial video on the plugin and also clear up the air on some common misconceptions about this, and similar plugins.
Cheers =)
Video Link
If viewing the video, be sure to have headphones as portions of the video will require you wear them to hear what the plugin is doing.
-

 Ivan RainsNew AFfiliatePosted on 01/16/2020 at 13:36:12This was a more of what it does rather than a particle application. What is the advantage of being able to turn your head? When bouncing does it need turned off or completely removed from the chain? I have used it for one mix and it actually diminished the quality when I played it on different systems; yes I treated it like it wasn’t there and I turned it off prior to the bounce. So I went from a good mix to one that sounded tinny on other systems yet sounded great through my headphones; I have two different pair that are on the list. Yes I measured my head and ears. I expected it to increase quality not diminish it. Are there any actual tutorials for this software?
 -
 jbastienmusicNew AFfiliatePosted on 01/16/2020 at 13:58:37Hey Ivan
What the plugin does is its actually application. If you’re mixing on headphones you basically turn it on and just work on your mix. That’s pretty much it. It’s very much “set it and forget it”. So other than inputting your head dimensions, (Headphone model if in the EQ list) unless you’re switching between the 3 speaker sets, there is really nothing else to be done in the plugin.
Being able to turn your head, it’s just like real speakers in a room. If moving your head around your mix position, how you hear the speakers would change. It’s a bit exaggerated in the plugin, but that’s the basic idea.
As for bouncing, yes, the plugin needs to be off before you bounce down. It doesn’t have to be removed from your master bus chain. Just turned off.
The only reason I could think of that it would diminish a mix would just be a normal adjustment period. If you bought all new speakers and set them up in a new studio space, it would take a little bit of time for your ears to adjust and adapt. The plugin would be no different. Just need to take some time with it is all.
As for other videos, I’m sure there are many more on YouTube. I made this video not long after the plugin was released so I have never looked for other videos.
Hope this helps.


